
Dragalia Lost is an action RPG on the bonds shared between humans and dragons. To make your initial first steps into the fascinating world of Dragalia Lost easy, we have come up with our Dragalia Lost Beginners Guide. This guide is divided into two major sections. We’ll provide an overview of the game’s core elements first for anyone going in blind, and recommendations on how to best manage your journey secondly.
Core Concepts
- Adventurers: the controllable Characters.
- Dragons: Characters that Adventurers can transform into during battle.
- Euden (The Prince): the Main Character’s canon English name. You can assign him your username of choice.
- Equipment: Weapons, Dragons, and Wyrmprints are equipable by Adventurers to bolster their utility.
- Rarity: Adventurers and Dragons come in three Rarities: 3, 4, and 5 Stars. Weapons range from 1 – 6 Stars.
- Wyrmprints: Stat boosting “Cards” with added perks. Rarities range from 1 to 5 Stars.
- Unbinding: Each piece of Equipment can be fused with up to 4 duplicates of itself. Unbinding raises EXP max level and upgrades the Equipment’s Skills and Abilities.
- Elements: all Adventurers and most Equipment/Enemies are attuned to either Flame, Water, Wind, Light, or Shadow.
- Weapon Classes: all Adventurers are split into either Swords, Blades, Daggers, Axes, Lances, Axes, Bows, Wands, or Staves.
- Co-Abilities: Stat increases tied to each Weapon Class, that benefit only the Adventurers you control, be it during Solo or Multiplayer quests. Duplicate Co-Abs don’t stack.
- Chain Co-Abs: Specialized perks similar to Co-Abs, except duplicates stack. They have more variations than regular Co-Abs.
- Stamina: Passive resource, consumed when playing Solo Quests. Refills at 10 per hour. Max capacity increases with player level.
- Getherwings: Passive resource, consumed when playing Co-op Quests. Refills at 1 per hour. Max capacity is 12.
- Consumables: Honey, in its three varieties, can be consumed to refill Stamina. Ethon Ashes, in its two varieties, can be consumed to refill Getherwings.
- Afflictions: Status conditions such as Burning, Frozen, Bleeding, Cursed, etc. that have negative effects on both Adventurers and Enemies.
Understanding the basic mechanics
Player Mechanics
Basic Attacks and Comboing
Starting off with the Dragalia Lost Beginners Guide, Tapping on the screen will make your controlled Adventurer perform a Basic Attack. Doing so continuously will result in a Combo, 5 taps will complete a combo, and tapping further will loop back around.
For brevity, we’ll refer to them as C1, C2, C3, etc. C1 being one tap and C5 being a full combo. Do note that C5 doesn’t always mean 5 hits: each Weapon Class has a different attack chain, and some can land various hits per tap.
Skills and Skill Point (SP) Gains
Adventurers, Dragons, and some Weapons have Skills, displayed at the bottom of the screen during combat. To use these skills, you must gather Skill Points (SP) via Basic Attacks. Each Basic Attack that lands will fill your skill gauges by a set amount (damage dealt doesn’t affect the charge). For example, two C5s with a Lance Adventurer will charge skills better than four C3s would, since the 5th hit of a combo provides more SP. SP gains differ between Weapon Classes.
The rule of thumb is to complete C5s when possible unless the Adventurer uses a Sword.
Force Strikes (FS)
Force Strikes are performed by tapping, holding and releasing, and can be used mid-combo, to connect combos or simply to reposition. Again, these differ with each Class. Force Strikes have SP gains of their own, can stagger regular mobs, and break Barriers instantly. But most important of all, they make the Overdrive Gauge decrease faster, especially Sword’s FS. Check Hostile Mechanics > Overdrive and Break States for details.
All things considered, basic use of the Force Strike within combos is as follows:
- Sword: C2>FS>C2, or C3>FS>C3. Provides good damage, waveclear, and some mobility. C4/C5 are lengthy and lock you in place, which can be dangerous against big bosses.
- Blade: C5>C5. Mainly a dodging tool, use FS to reposition when necessary.
- Dagger: C4>FS>C4. C5 is lengthy and can place you in a bad spot.
- Axe: Awkward to use due to slowness, but C5>FS, charging it mid-air.
- Lance: C5>FS>C5, or anytime to reposition,
- Bows: C5>FS>C5 takes getting used to, just using C5s is acceptable.
- Wands: Similar premise as Bows
- Staves: FS is not recommended, C5s are acceptable.
This is just a general recommendation. Some particular Adventurers have extra utility tied to their Force Strike, so they may require a special playstyle.
Note: Daggers, Lances, Bows, and Staves land multiple hits with their FS, while Swords, Blades, Axes, and Wands land a single one.
Shapeshifting
During a quest, above your current Adventurer’s portrait, you’ll notice the Dragon Gauge aside from your equipped Dragon’s portrait. Killing mobs, breaking dragon-shaped crystals, and when a Boss’s HP meets various thresholds, will fill this Gauge. When filled to 50%, you will be able to click the Dragon’s portrait to Shapeshift. You’ll temporarily transform into your equipped Dragon until a timer runs out. Afterward, you’ll revert. The Gauge can hold 2 charges, at 50% and 100%. At full, all further charge gained is lost.
- Dragon Time is increased with Bond Level. “Might” receives a notorious boost from Bond Level too. Be sure to feed your strongest Dragons every day.
- While shapeshifted, you can’t be staggered, and any damage received will deplete the timer instead of your HP.
- Using Dragon Skills will make your timer invulnerable to damage from Red/Orange markers, as normal Skills do (see Enemy Mechanics > AoEs).
- When the timer depletes, you’ll revert. If you are mid-skill when this happens, or receive damage that lowers the timer to 0, reversal is halted until the animation ends. Use this to your advantage.
Elemental Affinity
Five elements are in place within most of Dragalia Lost’s content. The two elemental wheels show advantages and disadvantages: Flame beats Wind, which in turn beats Water, which then beats Flame, completing the wheel. On the other hand, Light and Shadow beat each other, but from a Player’s standpoint (i.e. A Light Adventurer has an advantage against a Shadow Boss, but said Shadow Boss doesn’t benefit). The elemental benefits provided are as follows:
- Damage dealt: 50% increase when favorable matchup, 50% decrease when disadvantageous matchup, no effects when the same element.
- Healing: 20% Increase when healing same-element Adventurers, no penalties otherwise.
Dragons and elementally attuned Weapons also benefit from this affinity when equipping same-element Adventurers, with no penalties when the match-up is unfavorable:
- Dragons: Boost stats further, and permits matching Adventurers to use their skills and/or Auras.
- Weapons: Boost stats further, and permits the matching Adventurer to use the Weapon’s Skills (if any).
“Might” and Stats
Might is a numeric representation of overall power, calculated from various other stats. HP and Strength are the main contributors. An Adventurer’s total Might will be calculated from his own stats, and those added by their equipped Weapon, Dragon, and Wyrmprints. A team’s Might is the conjunction of 4 Adventurer’s Might. If you are looking to increase Might, head over to the Upgrade Menu, and follow these tips:
- For Adventurers, you can increase their EXP Level with Crystals, expand their Mana Circle Level, or Promote them.
- For Dragons, increase their EXP with Dragonfruit, and Bond Level in the Castle’s Dragon Roost by feeding them. Max Unbound Dragons improve their Aura and their Skill, also increasing Might.
- For Weapons, increase their EXP with Whetstones or by feeding them other Weapons. Max Unbound Weapons improve their Skill.
- For Wyrmprints, increase their EXP with Holy Water or by feeding them other Wyrmprints. Unbind them to improve their perks and thus Might.
- (Castle) Buildings: Altars, Dojos, Slime Statues, Fafnir Statues and limited Facilites provided through Events raise HP and STR of Adventurers/Dragons, which in turn increase their Might. Always have upgrades undergoing while you are playing or AFK.
Might by itself isn’t enough to gauge effectiveness though. A correct combination of Equipment, fitting to your Adventurer’s role, is important regardless of Might. (More on roles and teambuilding on “Early Game Walkthrough” > “Team Building” > “Sub – Classes”). Might also be deceiving as a gating method: the harder challenges like Advanced Dragon Trials and The Agito Uprising show Might requirements that are much lower than what’s actually needed, so beware.
Hostile Mechanics
Area of Effect Attacks ( AoEs )
Most enemy attacks will be projected on the ground through various shapes, including but not limited to circles, rectangles, and cones. You will notice the shapes get filled with a lighter shade of color: once the whole shape is lighted up, the enemy’s attack will go through. Not all hostile attacks are instantaneous, so plan accordingly. Be lest assured, we have got you covered with the best tactics in our Dragalia Lost Beginners Guide.
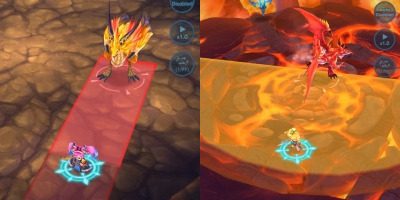
Later on you will notice other differences outside of shapes, these being:
- Red/Orange AoEs: you can use a skill, a helper, or shapeshift to become invulnerable to their damage and knockback.
- Purple AoEs: As an Adventurer, you are vulnerable to damage and/or knockback regardless of your actions. When shapeshifting, there’s a small cast animation which can be interrupted by these.
- Dashes: A dashing enemy will push you aside (no knockback) if you are mid-skill, and you will block the damage if there was no indicator or if it was red/orange.
- Hazards: (e.g.) Lava or Poison pools spawn by enemies. You can evade damage using skills, but resume taking damage after the end if you still stand on them.
- Non-telegraphed attacks: Some bosses attack without obvious notice. Pay attention to body movements, or exclamation marks for indicators. Most fast, non-telegraphed attacks behave like Orange/Red AoEs, in that you can use invincibility frames (i-frames) from Skill animations to dodge them.
Normal, Overdrive and Break States
Major Enemies show an additional bar below their HP Bar that denotes their State. Normal State entails an empty gauge, which fills up when the Boss receives damage. Upon 100% fill, the Overdrive state begins: the Boss’s Defense and Attack are increased, attack pattern changes, and the gauge now depletes when damage is received. Upon depletion, the Boss enters Break state, becoming briefly incapacitated and receiving extra damage. When recovered, Normal State resumes.
Force Strike attacks deplete the Overdrive gauge faster (but this does not mean they deal more damage to the boss’s HP). Swords are best at this, so remember to spam Force Strike as one during Overdrive. Some particular Adventurers and equipment may be centered around these states, warranting a special playstyle.
Early Game Walkthrough
Tutorial and First Summon
After downloading the game’s files, you’ll be thrown into a tutorial. You’ll be introduced to the barebone mechanics and the main story’s premise. Upon completion, you’ll be prompted to summon Adventurers by performing a Tenfold Summon, thus obtaining 10 random playable characters to start off your journey. Have no worries, with this Dragalia Lost Beginners Guide, we will show you the best and easiest possible ways to advance in the game.
More importantly, you will be gifted one 5 star rarity Adventurer from a selection of 9. If you wish to progress smoothly, it’s essential you make the right choice, but how to know what these strangers provide? Rest easy, we’ve ranked them for you:
- Hildegarde: Best healer in her element, meaning she’ll remain relevant throughout your adventure. Light affinity means you can take her to all content without her suffering penalties since there’s no elemental disadvantage to Light/Shadow. The curse is a very potent debuff, which she is 100% resistant to.
- Xander: Amazing offensive addition starting out, there’ll be farming to do and he’s the man for the job. It’s essential that you use Force Strikes with him though.
- Mikoto: Strong offensive unit and beginner-friendly. Will last you long.
- Julietta/Maribelle: Helpful starting out, but not a long-lasting addition to your teams. They both have 4-star alternatives that work better.
- Ezelith/Hawk/Nefaria/: Weaker characters who with late-game resources can become amazing. Chance is you’ll pick them up along the way, and there are cheaper placeholders anyway. Not recommended as first picks.
- Xainfried: Weak starting out, and while upgradeable later on, he doesn’t reach the same height as that ranked 5th. He overlaps with Elisanne as a buffing Water Lance, and Eli comes out on top.
Team Building
Starting out, we recommend you choose your 3 favourite/best Adventurers and make a team, deploying Euden as the 4th. Euden is advised because he passively increases your Experience Points (EXP) intake, which means faster level-ups, and in turn faster access to some features. Also, any Sword Adventurer is recommended as your leading unit, because their attack chain and FS are really helpful for breaking through groups of mobs. Informally called the “rainbow” team due to mixed elements, these are the Adventurers you want to dump most resources into before expanding.
Past Chapter 7, or whenever off-element teammates can’t survive quests, you may want to start using Elemental teams. Make five teams, one per Element. If you can’t fill all the slots, choose an Adventurer attuned to the same element as the enemies you are about to face.
Sub-Classes and Equipment
You’ll note the game assigns Adventurers with classes like “Support/Attack/Healing/Defense Units”. This denominations are not entirely consistent nor clear, so we propose the following 3 sub-classes, or roles, for beginner’s sake: DPS (Damage per Second), Healer, and Buffer. Simply enough, DPSers kill enemies, Healers prevent the enemies from killing the team, and Buffers make the former two’s job easier through boosts and situational utility, in addition to some damage of their own.
DPS: Dragons and Wyrmprints that boost their Strength, or Skill Damage if the Adventurer has at least one damage-dealing skill. Other perks that help damage dealers: Skill Haste, Critical Rate, or Affliction (e.g. Burn / Poison) Punisher. Examples of DPSers are Euden, Xander, and Mikoto.
Healers: Dragons and Wyrmprints that increase their HP, since their healing scales off of it, and Recovery Potency. Other perks that help healers: Skill Haste, Defense, and Buff Time. Strength has a minor impact on healing too, so a Wyrmprint like Jewels of the Sun which adds Skill Haste / Strength works. Examples of Healers are Cleo, Hildegarde, and Verica.
Buffers: Buff Time and Skill Haste suit them best. Dragon-wise, STR increases are standard, but any other Dragon that provides utility through their Skill (by inflicting Stun on a Boss, healing, or even more buffing) works too. Examples of Buffers are Elisanne, Sinoa, Xiao Lei as Offensive Buffers, and Patia, Emma as Defensive Buffers.
Wyrmite and Summoning
Wyrmite is the main summoning currency, and thus your main way of acquiring new Characters. It is mainly obtainable through regular play.
Summoning methods include Single Summons (i.e. one Adventurer/Dragon) and Tenfold Summons, costing 120 and 1,200 Wyrmite respectively. You will also gain Single and Tenfold Tickets, which work in a similar fashion. These are spendable in Summoning Events, where Characters from a base roster, together with a few Featured Characters, are acquirable. When their event ends, the Featured Characters join the base roster. Limited events like Gala and New Year’s won’t have their Characters do the same when they conclude, only returning when their respective Event does so again, with decreased summon chance.
Whenever you want to summon, any Tickets available will be expended first, and Wyrmite will go through only when no Tickets are available. Tenfold Summons guarantee you at least one 4 Star Adventurer, and every 10 summons you perform, your Rates for summoning a 5 Star Adventurer/Dragon increase. These are reset to their base value (4%, or 6% for Gala Events) when you finally land one or more 5 Star rarity summons.
Dragalia Lost Beginners Guide: Quick Tips on Wyrmite
- If you have Single Tickets and Rates at base value, spend 10 Single Tickets before proceeding with Tenfolds.
- Doing Tenfolds with high Rates means you may summon two or more 5 Stars before your Rates are reset. Avoid Singles when your Rates are higher than the base value.
- You can check how many times you must summon before the next Rate increase through the “Appearance Rates” button.
- Without Tickets, Wyrmite Tenfolds is the way to go. (Unless you are halfway through to a Rate increase, round it up with Singles then).
- Gala Events are your best bet. Base Rates are higher, which means more high rarity Characters for the same amount of tries. Their featured Characters are not only extremely powerful but limited to the event’s short time frame.
Items, Materials, and Upgrading
Warning: Under no circumstances should you use Wyrmite to summon items in the shop. You are paying a great cost for very little in return. This is a common rookie mistake that can set you back greatly. The daily free summon will suffice, don’t accidentally keep summoning after claiming it!
We strongly recommend you refrain from spending any resources leveling or upgrading stuff, for now. Draglia Lost has a great variety of resources to keep track of, and many of them will present a bottleneck if you gimp yourself early on by improperly spending. Holy Water for Wyrmprints and Eldwater for them and Adventurers, Iron Ore / Granite / Meteorite, Damascus Ingots are such an example. Reserve these for higher rarity upgrades when possible, specially the ingots. A common rookie mistake is using them on Tier One, 5 Star Weapons. Since all weapon trees in the Smith menu have three tiers, and Tier One are the first ones you recieve, you may feel tempted to Unbind them using Ingots. This is a grave mistake, as you want to save these for their Tier Three upgraded version, since it’ll save you most materials.
Raid Events are a great resource income, if one is ongoing while you’re leveling up it’s advised you switch to farming it. Not only will you get a great variety of important leveling up items, and EXP for the party you use to clear quests, you will also receive a free adventurer who’ll become a permanent part of your roster if you use him a set amount of times. A dragon will also be given to you and you’ll be able to unbind it completely for free just for playing. These events require mainly wings, which you’ve probably been overcapping on, so make sure to dump excess wings here.
The Halidom and it’s Facilities
The Halidom Castle is your hub for more passive upgrades through the use of Facilities. Rupies/Gold generation from Mines, Elemental/Weapon boosts from Altars/Dojos, as well as Weapon Forgery from the Smithy, etc. It’s essential that you keep improving all buildings therein consistently. But where to begin?
First of all, you will notice in the upper-right corner of the Halidom screen that 3 “Wyrmsmiths” are available for use. Each can upgrade one building at a time. Wyrmsmiths can be increased to 5 by spending Wyrmite. We highly recommend doing so if you plan on sticking for a long ride, the sooner the better. Doubly so considering your building times will be halved for your first month as a new player. You can instantly finish a building’s upgrade by spending Wyrmite, which we advise against, or spending Hustle Hammer items. These are a better alternative, but again, they are best used later on, when buildings can take up to two or three days.
Dragalia Lost Beginners Guide: Quick Tips on Resources
Here are some additional tips and tricks in our Dragalia Lost Beginners Guide to help assist your journey.
- Focus on your Gold Mines reaching LvL 16 first and foremost. A lot of Rupies will be consumed starting out and you need the passive income.
- Secondly, aim for LvL 16 Elemental Altars. LvL 16 for most buildings grants a big jump in stats, repeated at 31.
- Disregard Dracoliths for now, their boosts are minimal, and their required resources are better spent on upgrading Mana Circles.
- Weapon Dojos are important, but focus on acquiring some basic weapons first since they require the same resources. Leave Dojos for when your Elemental Altars are leveled up.
- The Smithy grants access to said weapons, so upgrade it to LvL6 as soon as you meet its requirements.
- Some playable Events grant you a Facility with specific boosts. Prioritize farming the event and building its Facility when available, because if the event ends before doing so, you’ll be stuck without building resources halfway through.
Imperial Onslaught (IO), Void Battles and the Treasure Trade
After getting comfortable with the aforementioned core aspects of the game, you’ll start meeting the requirements to unlock the Imperial Onslaught and the Void Battles. These are your first big steps as beginners in Dragalia Lost, and these are very important resource providers that will guide you into quick progression further.
The Imperial Onslaught will provide the resources to the some of the most important upgrades needed to progress. Not only does it contribute to Weapons and Dojos, but also Boss Wyrmprints found in the Treasure Trade. These Wyrmprints will allow you to stand a chance against the 5 Boss Dragons in the Advanced Dragon Trials. But that’s for much later. What is important to grasp now is that there’s never a wrong time to farm IO. It should and will be your most farmed quest out of the whole game, for good reason. But don’t worry, soon enough you’ll have progressed so that your elemental teams can farm them on Auto-Play at 2x pace.
Void Battles are rotative Bosses that will hone your understanding of late-game mechanics, but most importantly, they will provide you with Void Leaves and Seeds. Through the Treasure Trade, you will be able to change these for invaluable resources that you’ll find yourself constantly grasping for early on. When these resources don’t feel like a bottle-neck anymore, pay special attention to the Fafnirs found therein: they boost Mana, Adventurer EXP and Rupie acquisition substantially. When ready, trade for 4 Gold Fafnirs, and use them on each Adventurer when farming Avenue to Fortune. From then on, make it a long term project to acquire more copies and MUB one at a time. You’ll need all the gold you can get.
Moving Onwards
Once you have gotten comfortable with all the subjects found in this Guide, you are set for progressing under your own volition. Ideally, you’ll fight your way up through the Void bosses, which will let you better face the Astral Raids presented every other weekend. Particularly, the Void Dragons and Chimeras will be the bridges that connect you to the Endgame: the High Dragon Trials, and the Agito Uprising. Requirements will be high, both gear and skill-wise, but the rewards will be even better.
Stay tuned for upcoming guides about these game modes and more, and remember that in the end, playing at your own enjoyable pace is the best gameplan. And if ever in a dilemma on how to progress further, never hesitate to fallback to this Dragalia Lost Beginners Guide for tips.
Did you find this Dragalia Lost Beginners Guide helpful? Do let us know in the comment section below!
For more Mobile Gaming news and updates, join our WhatsApp group, Telegram Group, or Discord server. Also, follow us on Instagram, Twitter, and Google News for quick updates.